Tag

diy

When I think of summer I almost always immediately think of all the opportunities that we have to gather with our friends in family in our home! The kids are out of school, the days are warmer and the nights start later, all perfect ingredients to a fantastic summer. I don’t know about you but I love making my home as welcoming as possible when guests come over. From making my living room feel stylish and warm to my backyard being functional and fun, I strive to have my house feel like a perfect place for friends and family. And it starts at the front door! Welcome to the people you like most with these incredible summer DIY wreaths!

Dollar Store American Flag Wreath

image_11-580x570

Credits: dollarstorecrafts

This patriotic beauty takes only a few minutes to make, a few dollars to buy and will make your door look beautiful for Fourth of July and beyond!

The Hanging Wreath

spring-wreath-4

Credits: somewhere-in-the-middle

This wreath looks like something out of the forest! Simple and beautiful, the wreath is perfect for dark doorways that need lightened up!

The Letter Says is All

handmade-spring-tulip-wreath

Credits: sugarbeecrafts

Represent your family name while welcoming guests into your home. This simple to make, rustic wreath is the perfect way to personalize your entrance way.

Flip Flop Wreath

closewreath

Credits: southernscraps.blogspot.com

This is another very easy and inexpensive wreath for your home! Head to the closest dollar store and grab a few pairs of children’s flip flops and grab some old rags or clothes that you are getting rid of and make this! Nothing says fun in the sun like a pair of flip flops!

Succulent Wreath

IMG_9890

Credits: prettyprudent.com

Succulent projects have become very popular this year in large part due to the fact that they are so easy to take care of and inexpensive to find! This beautiful wreath will bring your front door to life!

Mini Umbrella Wreath

IMG_2961-680x1024

Credits: cfabbridesigns.com

I love summer afternoons by the pool with a cocktail topped with a mini umbrella! I don’t know what it is but a cherry on of these can make any drink better! So head to the store and grab a few bags of these to make the perfect wreath for your home.

Take Me Out to The Ball Game Wreath

stl-cardinals-baseball-wreath-detail

Credits: howtonestforless.com

Though never in my life would I put a Cardinals wreath on my door as a diehard Red Sox fan, I do have to say this wreath is pretty adorable even if it would look better with a different team! So grab your favorite team memorabilia and show off your team spirit!

Burlap Wreath for Beginners

burlap-wreath-with-ribbon-idea

Credits: howtomakeaburlapwreath.com

Burlap wreaths are beautiful but burlap can be a difficult material to use! This amazing tutorial will help you make the perfect burlap wreath for your home, with little to no DIY experience needed!

The “Gone to the Beach” Wreath

summer-wreath

Credits: fynesdesigns.com

Let art imitate life for you beach bunnies out there! This adorable wreath is definitely for a more advanced level DIYer if you are going to sew these cute little swim suits but it’s totally worth it!

Sandcastles and Sun Wreath

002

Credits: wordsuponwheels.blogspot.ca

I love upcycle projects and this by far the cutest I’ve seen in awhile! Upcycle those old beach towels and old pool noodles to create this wreath perfect for all summer long!

Wreaths are one of those perfect home decor items that anyone can do! Whether you live in an apartment, house, trailer, dorm or really anywhere else you can liven up your front door with any of these options! Make it so that when you walk in your door, your day and the days of you guests are brightened!


Article written by Tabbie Stark, also a writer for homeyou.com, a company that connects homeowners to reliable, affordable and professional contractors for their home improvement projects. Check more on Facebook, Instagram, Pinterest and Twitter.

The time has come to oust the winter dullness and embrace the spring revival and the upcoming Easter rush. Even the less crafty of people are tempted to join the decoration band waggon and make something exceptional that adds up to the holiday spirit. I’ve looked everywhere for inspiration and ideas and compiled my ultimate selection of easy-peasy Easter decorations you can create on your own. Check it out.
Easter Decorations You Can Make Yourself

Easter sweets as Easter decorations?

Easter sweets are not only mouth-watering, they come in gorgeous shapes and colours too. If you can’t help yourself but buy every Easter themed candy you come across, why not employ a portion of that large batch for the vase decoration. A transparent wide vase would be perfect for this project. From rainbow-tinted jelly beans, marshmallow bunnies to golden-wrapped chocolate eggs, it all makes it into the vase display. Finish it with a nice ribbon and a few flowers on top.
Easter Decorations You Can Make Yourself

Cute chicken place markers

Cheer up your family members with some delightful personalised surprise in the form of cutsie placeholders. This will require tiny earthenware pots for every person. Make the chicken element using thicker plastic spoons, nail polish and markers. Dye the whole sets into a customised shade (the owner’s favourite). Embellish it with polka dots and name plates with special fonts. Your loved ones will be blown away!
Easter Decorations You Can Make Yourself

Eye-catching door setup

I’ve never seen this before so I have to share! To enliven your front door for spring arrival with Easter decorations, consider placing some real or satin flower ornaments. What we had in mind is utilising an umbrella or a soft hat in some earthy colour as a socket for the bouquet. Attach the whole construction with an appropriate ribbon in some bold hue. Round up the setup with several faux eggs and grass to give it a veritable homey look.
Easter Decorations You Can Make Yourself

Bunny-fied family photos

This one scores big points for both cost-effectiveness and decidedly adorable detailing. If you happen to find them, and I’m certain there’s plenty to choose from since it’s the holiday season, get yourself some bunny stickers. The purpose we had in mind is total bunnyfication of the displayed family photos in your home. Apply the ears, noses and mouths in random fashion on the frame glass. However, if the ratios are off, make your own sticky cutouts. Hop you go, bunnies!
Easter Decorations You Can Make Yourself

Blossom flower pieces

I’m just not super keen on loads of flowers on the table near food (insects and such, you know), so I opted for something modest but not less charming. Since the spring has come a knocking, chances are that some branches can be found in your close neighbourhood. Select some nice, thinner pieces. Take some currently blossoming flowers and glue them to the branches. Lastly, secure the arrangement with tiny pebbles in an elegant jar.
Easter Decorations You Can Make Yourself

Earthy table feel

I just had to include this table decoration as it was something special and works in a complementary manner with the blossoms. You can have a few mini oasis settings right there at your table. The idea remind me of those tiny sustainable ecosystems people make. You will need: several tall glass transparent cloches, some dirt and moss and several nice fern sprays. Use the dirt and moss to secure the fern and voila!
Easter Decorations You Can Make Yourself

Versatile countdown calendar

Are you buzzing constantly about Easter topics a month or two prior to actual day? If you’re like myself, this all age proof calendar will make the countdown more enjoyable and fun. Join in with your children or little cousins and cross out the days before big holiday. Grab some multi-coloured plastic eggs with a cap and fill it with treats and happy messages. Adjoin it on a paper calendar board and it’s on!
Easter Decorations You Can Make Yourself

These ornaments are not going to make themselves. Hurry up and get down to decorating.

Hoppy Easter everybody!

There’s something magical about Christmas that makes us want to create our own decorations, and when we have a specific theme in mind, we want to have decorations that match that theme perfectly. That’s why DIY Christmas decor and decorations are extremely popular right now, and we’ve rounded up 5 of the easiest DIY Christmas projects.

Frosty Mason Jar Lanterns

frosted candle votivesSource: Bored Bean

There are two ways to achieve a wonderfully festive frosted effect for your vases, candle votives, and mason jars. The first is to use faux snow and the second is to use epsom salt. Both require Mod Podge to adhere the frost to the glass. The faux snow creates more of a frosty look while the epsom salt creates more of an icy effect. Both ways look stunning and are super simple to create.

Twinkling Christmas Canvas Art

twinkling canvas artSource: Brass and Whatnots

Using LED lights to brighten up canvas art is a wildly trending DIY project right now. Why not take advantage of all the free tutorials and create your own Christmas version? You can have your twinkling canvas art say anything you want. From a meaningful line in your favorite Christmas carol to a family motto, your festive imagination is the limit.

Glitter Christmas Light Magnets

glittery Christmas light magnetsSource: A Diamond in the Stuff

In many homes, refrigerators lack the holiday spirit. Instead of having a bland fridge this year, dress it up with these incredibly easy and cute glittery Christmas light magnets. Use them to display your Christmas cards on your fridge or to keep your Christmas dinner shopping list close at hand.

Adorable Sock Snowmen

adorable sock snowmenSource: Creative Me Inspired You

When you’re looking for an irresitably adorable DIY Christmas decoration, make these super simple sock snowmen. These soft and cuddly snowmen are fantastic Christmas decorations for a kid’s room, on your mantel, or just about anywhere in your home. If you have a guest staying with you for the holidays, put one of these snowmen on a pillow so your guest will feel comfortable and welcome.

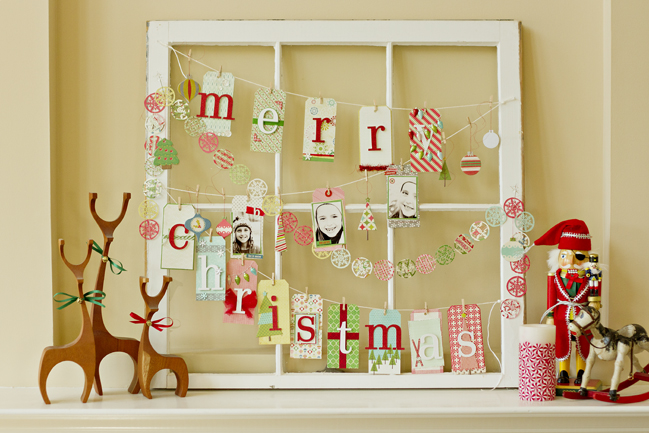
DIY Recycled Christmas Window

recycled Christmas windowSource: Shimelle

For a personalized, colorful, and creative way to display your holiday spirit, make your own Christmas window out of a recycled window frame. Use photos of your friends and family and cute out tiny trees or snowflakes from colorful scrapbook paper. Then display it on your mantel or hang it on a wall for everyone to see.


Article written by Kelly Mahan, also a writer for Homeyou.com, a company that connects homeowners to reliable, affordable and professional contractors for their home improvement projects. Check more on Instagram, Pinterest and Twitter.

Painting your home is one of the most important things for the general impression that it is going to create. It is exactly for this reason that most people decide to hire professionals to do it. Although the proper painting equipment is not that expensive to buy and acquire, painting itself is far from easy. Still, this does not mean that it is something that you couldn’t do properly on your own. Just follow these few tips and tricks and you will in no time be able to paint your home like a pro.


Protect the surfaces in the room

Before you start with the very process of painting, it is vital that you first prepare the room properly. Try to remove from the room anything that can be moved with ease, and as for the rest try to find a way to cover it. Cover your furniture, sometimes even parts of your floor with something old, something you wouldn’t miss too much if it was ruined. Another great idea is to try and cover it with some outdated newspapers. Although some professionals pride themselves in never staining this is mostly just plain boasting. Better be safe than sorry.


Getting the right equipment

Now, before you start on your quest to transform your with the use of colors, you need to acquire the right tools for the trade. First of all you will need some things for preparation, or the first stage of your painting process, such as spackle and spatula, some soap and water solution and painter’s tape. Next you need some painting equipment like paint brush, roller and paint tray. After you have all of this covered it is time to start worrying about the paint itself.


The choice of paint

First thing that you must have in mind here is the fact that painting is not something you do that often. Your walls require painting at most once every few to several years so when you do decide to do this, do it properly. However the key to this is finding the right interior paint. Color is also crucial here since it is known that different nuances can effect human psyche in different ways. Just remember if you don’t like the color, or later find that that particular paint won’t stick, you will be the one who will suffer for it. A bit of negligence here can cause you some serious problems for you in the future.


Be careful about the dipping

Dipping your roller into the paint is a skill on its own. Throwing it inside the tray all the way, every time is not a way to go, and can cause your paint to seem unequal or cause it to drip all over. Try inserting just the tip of your roller and then rotate it with you finger in order for it to properly soak up the paint. For those who do not have enough confidence to try this on their own, getting a specially designed roller called the paintstick might be just the thing you need.


The right direction

In the end, it is essential that when you start applying paint, you do so top to bottom. Gravitation forces paint to slide down the walls, so if you start form the bottom the paint will just pile at the base. On the other hand if you start from top and roll down towards the floor you can turn this situation to your own advantage and this is why this kind of painting motion is the only proper one.

Not everything is about money. It is true that for the right fee a professional can paint your home in a matter of hours. However, just the knowledge that you did something with your own two hands can often be enough for people to make up their mind for a DIY painting project. The choice is all yours but if in the end you do decide to paint on your own, make sure that you do this by the book and do both yourself and your walls a gigantic favor.

Candles have always been a practical and beautiful ornament in our homes. Apart from providing an additional, source of mild light, candles also have numerous other purposes. They embellish every room and provide it with the subtle scent, making the air in the room fresh and pleasant. Today, candles of various shapes, colors and scents can be bought, but our choice usually depends on their price. However, what would you say if we told you that you could make a candle on your own? Homemade candles are affordable, since you practically make them out of things you already posses. They represent your uniqueness, since you can personalize them choosing the shape, dimensions, scent and even colors of the candle on your own. Amazing, isn’t it? The entire process entails several phases that need to be strictly followed if you want to achieve positive results.

How to make a candle?

The process of making your own candle is creative and not difficult at all. Firstly, is buying the ingredients needed for making your own essential candle, such as wax flakes, essential oils, crayon pens and finally, a container for a candle. When it comes to tools, you should have chopsticks, scissors and a pot. When you have found all these things, you can begin. The first step is melting wax flakes, after which you are supposed to add colors and scents according to your tastes. The wax is then poured to the candle container, in which was a candlewick was previously placed and fastened by two chopsticks. Finally, you need to leave the candle for a couple of hours to cool.

How to make and decorate candleholder?

Now, here is more creative process. Choosing a perfect candleholder and its decoration is one of the most interesting parts of this procedure. Firstly, you have to determine what kind of a candleholder you actually want to make. You can choose the design and the material you want to use.

One of the most creative ideas is making an indoor candleholder from a small piece of branch. All you have to do is to have an appropriate tool in order to drill it from inside, making enough space for a candle. Since the candle is practically within the holder, its light and scent are reduced. This technique of making a candleholder is quite simple, cheap and it serves its aesthetical function.

You could also make tiny candleholders out of plaster, which looks really nice. However, although it seems as more complicated process, don’t be discouraged. Following the steps for making it, you will definitely succeed.

You can use jars as candleholders, as well. One way to do it is to paint the jar with translucent glass paint and put the candle inside. The light provided with such a candle will be more intensive and colorful. You can use them even for a party, as an embellishment, which is especially interesting when you several of them.

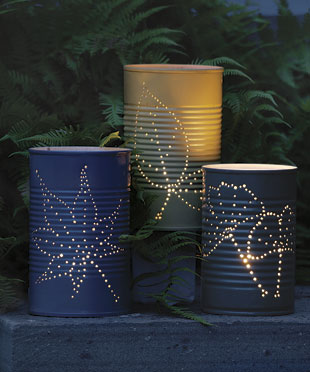
Finally, you can make a candleholder out of a tin can. The procedure is quite simple- all you have to have is nails and hammer for punching holes. You can decorate it whatever you want, making those holes in different shapes and dimensions. Such candleholders are really elegant and fascinating.

These are just some of the possible ideas you might use when decided to make your own candle. These instructions will simply help you to achieve your goal, but you can choose any design and method you like. Such candles will bejewel your home, giving it sophistication and mild scent. Since they are a result of something you were trying to do hard, they can also serve as unique presents for everyone you love. So, don’t be lazy for, once you try it, you won’t regret for sure!

Getting things done with my two hands and some tools was always a source of great joy for me. Yes, I am definitely one of those DIY maniacs that will try to fix things a hundred times on their own before calling a professional to do it.

Naturally, I know that the type of table like the one that I made can be found for a lot less money then I paid for the material just to make it, but the hours and hours of fun and satisfaction when you are able to say “I made this!” are priceless.

On the other hand, I think that there is nothing more frustrating than having the urge and an idea to finish a project, only to find out that you don’t have the tools to get it done.

Therefore, here is the list of tools that I cannot live without. This time, I’ll just skip the basic hammer and screwdriver things as they go without saying.

Oscillating Multi-Tool

If I had to choose and save only one tool from my collection from a raging fire, I’d probably go for this thing. My reason would be the fact that it covers such a vast array of things that you can do with it and it is easy to use.

It cuts down on the time that you waste on doing boring things and gives you more time to do the stuff that you like about your project. It is basically a motor that has a lot of extensions and accessories.

Depending on the power of the motor, you can use it for cutting, grinding, scraping, grout removal, you name it!

Cordless Power Drill

When I started making things and fixing things, I couldn’t believe that making a hole in something can be so demanding. But a power drill solves a lot of problems in that area. Since it is that fast, the hole rarely damage the surrounding area which is pretty neat.

Another things that I hated is tripping over the cords, finding the power socket to plug in the drill and reach the place where I want to drill. Needless to say, a cordless drill has been a dream come true for me.

Compact Saw

I love woodworking. Naturally, if you are into the woodwork, you need to cut some wood and you need to cut it frequently. So, what you really need is a good tool to make that happen and you can start by checking out the list of the best table saws for your needs.

A compact saw will make this job perfectly easy to do. It may not be as strong and as useful as the big circular saw, but it has its advantages.

It is small and easy to handle and it can reach places that a big saw cannot. You can easily handle it and easily transport it which is important for me as I mess around friend’s homes as well. Also, the maneuverability is amazing.

Angle Grinder

I am no stranger to metalwork as well. I’m not as much into it as I am into woodworking, but from time to time, some metal pieces just need to be fixed.

Angle grinder is that tool that you use for removing excess material from the metal. As the name suggests itself, it is used to grind metal, to sand it and anything else that comes into your mind.

It is all about choosing the proper disc for the job you need done and taking the power of the motor into consideration.

Quick Painter

Putting a fresh coat of paint is my annual spring routine. It feels like a new home to me when I do it. However, it would be a much harder job without a quick painter.

The painting itself is not that hard, but the mess that happens is what kills the joy of the whole thing.

My quick painter has a container in which you put the paint and then just press the pad against the wall and the paint comes out. It also has the attachment for the angles which is truly a life saver.

Spray Gun

There are many types of spray guns depending on the way they work. Mine is a regular air spray gun. The whole point is that it is under pressure and you fill it with paint or whatnot and it will disperse that liquid on the surface of your choice. I use it to paint my woodwork mostly as I want to avoid the brush strokes.

My friends used it to paint their car. When you think about it, the uses are very diverse, you just need to figure out how to operate it.

I don’t know a DIY lover who isn’t crazy about tools.

This is just a shortlist of the stuff that I have in my tool shed, but if I had to organize a new place for my projects, these would be the things that I’d buy first.

Have you ever wondered what would have happened if the house became too small for a family? Well, there are several practical solutions to this situation. Firstly, the space can always be expanded, both horizontally and vertically.

However, when even this doesn’t help enough, there is one more thing to be done- reorganizing and utilizing your attic. There are many problems that can be concerning, such as the height of the room, heat, insulation and even, the additional windows.

But, don’t worry, because the answers to all these questions are available and the realization of your plan is easily attainable. After all, it doesn’t seem as a no win scenario at all.

Height Is The Most Important

First thing first, you need to measure the height of your attic. Depending on the measurements, you will know whether the attic is appropriate for utilizing or not. This also depends on how you plan to use the attic.

If the attic is used as a bedroom for an adult, it has to be at least 2.4 meters high. On the other hand, if you want to turn it into the children’s room, the height of 2 meters will be sufficient.

Attic

Let The Sunshine In

Another crucial factor, without which the whole process would certainly be impossible, is the existence of windows. As any other room in your home, the attic has to provide healthy environment for both you and your family.

This means that the fresh air needs to circulate all the time, and a lot of natural light needs to be provided. But, one question needs to be posed. How can we construct the windows in the attic?

There are two solutions to this problem and they are highly dependent on the position of your home. If the house faces north-south direction, then the windows can be constructed on the walls, which is undoubtedly the best solution.

On the contrary, if the orientation of the house is in the east-west direction, then the windows can be inserted on the roof, which could be more exhausting and complicated process.

Warm And Comfy

Also, you should pay attention to the additional insulation on tile. However, during the winter and the summer time, there is a considerable difference between the temperatures in the attic and in the rest of the house. It is cooler during the winter and warmer in the summer.

Attic insulation


That is the reason why the insulation is highly recommended. There are several types of it, and the most commonly used are aluminum foil, glass wool or polyurethane layer, which could be easily installed beneath the tile.

You should also keep in mind that you need to be extremely careful when it comes to the selection of the materials you want to use for the construction. Lightweight materials, like wooden floors would probably be the best solution.

All in all, following these tips, you would certainly be able to give a special purpose to your attic.

Instead of having an additional room for pilling up the unnecessary stuff and clutter, you could expand your home by adding a whole new room, then organize and personalize it on your own. Finally, choose the interior details and the furniture and enjoy!


Remodeling a house before selling it is one of the smartest moves you can make. In the last few years, resale values were extremely low, as well as the construction costs, but this year, they are constantly climbing, making this topic even more attractive to everyone.

This is why, if you are planning to put your house on the market, you should remodel it first. Therefore, that is certainly one of the wisest advices, since the remodeling is supposed to have an immense return on investment.

It includes some quite simple and low-cost renovations and reconstructions that would undoubtedly mean a lot to you when it comes to the estimating the value of your home. Your only task is to make a house attractive to a potential buyer.

Safety Above Everything

There are several things you should certainly do if you want to increase the value of your house. One of the best ways to do it is replacing the front door. This has always been considered as a highly effective tactic, which returns more than 90% of the initial cost.

The potential buyer will always look for a home that would be safe for both him and his family. For instance, a steel entry door will always perfectly serve the purpose, both aesthetically and functionally.

Another way of providing the safety to your home is replacing the garage door, which is again, really cheap and cost-effective.

Hire construction waste responsibly

To rebuild and renovate is great but you should keep the environment and impact you have on it. That’s why as a reputable dumpster company we advise all our clients and local partners to segment waste as much as possible so we can later on forward for repurposing or recycling.

A Place For Relaxation

If you don’t have a wooden deck area, it would be useful to add it onto your house. This part of the house associates the buyers with many positive things like relaxation, peace or hosting the people they love.

Thus, apart from being undoubtedly practical and offering the sense of simplicity to the house, the wooden deck will help you sell a house in a short period of time.

This relatively cheap improvement returns on above 85% of the cost, which is indeed fascinating.

Give Every Room a Purpose

Finally, you could renovate a certain room in your house. It is very important to keep in mind that every room in the house should have a specific purpose, which would intrigue a potential buyer for sure. The best way to realize this idea is to reorganize your attic or the basement.

You could possibly turn your attic into the office or the bedroom, and the basement into the playroom for children. These changes result in numerous positive effects, including the fact that the house automatically expands and becomes even more comfortable for a family.

Another thing you can change is the floor. In the past, carpeting was very popular, but today it is considered aesthetically plain and extremely difficult to maintain.

Therefore, you could replace it with a simple hardwood, which would certainly contribute a lot to the interior of the house, giving it a sense of a simple beauty.

As you have probably noticed, this venture can have numerous immense outcomes. Also, it might help you to sell your home for even a better price than you thought.

More importantly, you can renovate the house and make the abovementioned changes on a tight budget.